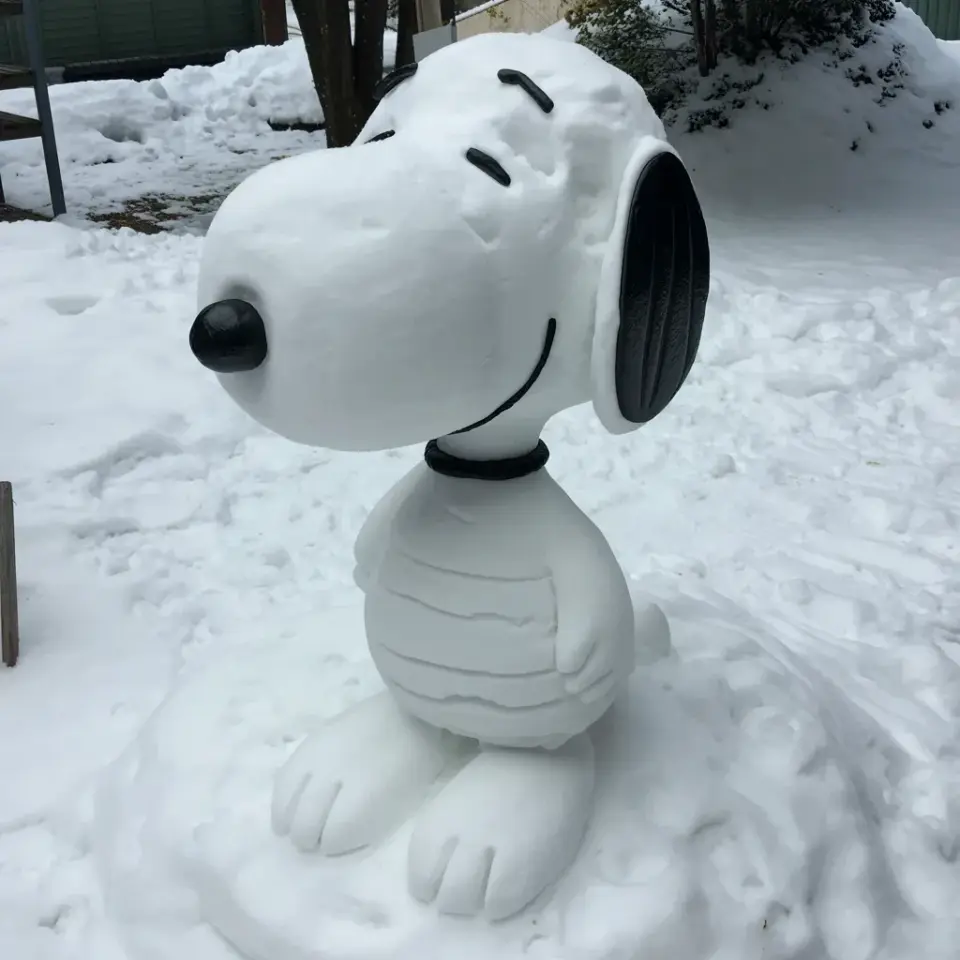
Building a snow sculpture like this Snoopy from the Peanuts gang takes patience, but the biggest mistake I see people make in snow sculpting is not packing the snow tightly enough. That photo of Snoopy with the horizontal striations? Those lines come from compressed layers, and if you skip that step your sculpture will crumble before you add the black nose. I learned this the hard way after a few lopsided attempts that turned into sad heaps of powder. Whether you are on a strict budget or just want to use stuff you already own, I will show you how to avoid that fatal flaw and make your own wintercraft project shine.
The biggest snow sculpting mistake (and how to fix it)
The most common mistake people make is thinking any snow will work. Loose, fluffy snow is great for snowballs but terrible for carving. When you pack it loosely, your Snoopy will develop cracks and crumble as you try to refine his ear or snout. The horizontal striations you see in the photo are actually a sign of good technique, they come from compacting each layer before adding the next. If you rush that part, you end up with a snowy blob that looks more like a ghost than a beagle. The fix is simple: spend ten extra minutes on compaction. Really press the snow down until it feels solid and holds its shape when you tap it.
Why packing snow tightly matters for your Snoopy sculpture
Tight packing creates a dense surface that holds detail. Think of it like baking a cake, you need the right batter consistency. For snow, the moisture content matters too. Dry snow requires a little water to bind, which I will cover later. But even wet snow needs firm packing. If you look at the photo of Snoopy, his body has clean lines and his drooping ear stays defined because the snow was compacted so well it almost looks like ceramic. Loose snow would make that ear fall off in five minutes. So before you shape anything, get the base right. A solid foundation means your sculpture lasts longer and looks sharper.
Affordable ways to make snow blocks without spending money
You do not need a fancy snow block maker from a store. On a budget, you can use a plastic storage bin, a cardboard box, or even a sturdy trash can. Fill the bin with snow, tamp it down hard with your hands or the flat side of a shovel, then let it sit for a minute before turning it out. Your goal is a compact rectangular block that you can stack and carve. If you have a set of plastic milk crates, those work too because snow squeezes through the holes and creates a textured block that holds together nicely. I have used a large Tupperware container before, and it made a perfect head for Snoopy. Just make sure whatever you use has straight sides for clean edges.
- Plastic storage bin – pack snow tight, then flip and tap to release.
- Cardboard box (lined with a plastic bag) – works but only for a few uses before getting soggy.
- Trash can – great for a large torso, just line it with a grocery bag for easy release.
- Milk crate – creates a block with built-in texture, which can add nice striations.
Simple shapes to start your Peanuts snow sculpture
Begin with basic forms: a round head, an elongated oval for the body, and a small cone for the snout. Do not try to carve Snoopy’s entire silhouette from one block. It is easier to roll balls of packed snow and stack them, then carve them together. Start with the body, about the size of a beach ball, then the head, about the size of a basketball. Attach the head by packing a handful of wet snow between the two parts. For the snout, shape a small cylinder and press it onto the face. Keep checking your reference photo. Snoopy’s head points slightly upward, so tilt the snout a little. Keep the shapes simple until the body is stable. You can always refine later.
Adding Snoopy's features (the black nose and ear last)
Once your basic shapes are set and the snow has firmed up, it is time for details. In the photo, Snoopy has a black button for a nose and a dark beak that looks like black paint or charcoal. For a budget option, use a few pieces of charcoal from your fireplace, or buy a pack of black buttons from a dollar store. Press the nose gently into the snout, do not push too hard or it will crack the snow. The drooping ear is a curved piece of snow that you carve with a butter knife or a small spatula. Start with a thick ridge and shave it down to match the comic strip shape. The beak is tricky, so I like to carve a small indent first, then insert a black triangle made from cardboard covered in black plastic tape. That way you do not ruin the snow if it breaks.
Using a spray bottle to finish your wintercraft
A spray bottle filled with cold water is your best friend. Lightly mist the surface of your Snoopy sculpture to create a thin ice shell. This locks in the details and gives the snow a smooth, almost glazed look. It also helps cover up any small cracks or uneven patches. Spray from a distance, about a foot away, so the water does not carve channels. Do this after you are done carving but before the sun gets too warm. In the middle of the day, the water will freeze quickly and protect your work. I have kept a Snoopy sculpture looking crisp for days just by spraying it every evening. It is the cheapest fix for crumbling snow and makes your DIY snow art last longer.
Easy cleanup and storage for your DIY snow art tools
When the day is done and your Snoopy is standing proud, do not leave your tools outside to freeze into a block of ice. Rinse your plastic bin, shovel, and spray bottle with warm water, then dry them with an old rag. If you used a cardboard box, toss it in the recycling before it turns to mush. For the black button nose, you can clean it and save it for next year. I keep a small wintercraft kit in a plastic tote with a few dollars worth of items: a couple buttons, a piece of black fabric, a cheap spray bottle, and an old butter knife. That way next time it snows, you are ready to build again without spending a dime. Just remember the golden rule of snow sculpting: pack tight and spray light.
Making a Snoopy snow sculpture does not require fancy tools or a big budget. The secret is taking time to compact the snow, using things you already have around the house, and adding the small details last. That black nose and drooping ear will make your sculpture instantly recognizable, and the horizontal striations from your packed layers will actually add character. So grab a bucket, a spray bottle, and some good snow. Build your own Peanuts friend and see how long it lasts. I would love to hear how your Snoopy turns out, drop a comment with your best snow sculpture tip.
#snowsculpture #snoopy #wintercraft #snowmanmistakes #diysnowart
Leave a Comment