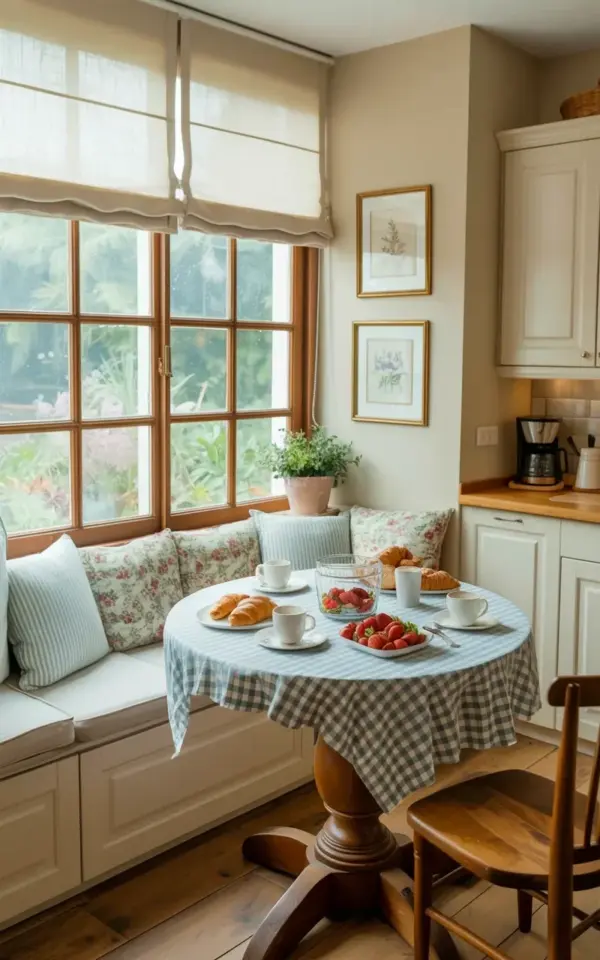
When you picture the perfect breakfast nook, you probably see something out of a catalog, the kind with custom upholstery and a table that cost more than your first car. But honestly, the best budget breakfast nook ideas usually start in the exact opposite place, with a headache. Or a bad measurement. Or a Craigslist find that seemed like a good idea at the time. Look, I’ve been there, and I’m here to tell you that the little corner in the photo above, the one with the round pedestal table and the built-in bench, didn’t happen by accident.
That space works because it avoids the common traps we all fall into when we try to furnish a small corner. It’s not about the money you spend. It’s about the mistakes you don’t make. So let’s talk about how to fix those blunders before you buy a single throw pillow.
Don’t Run Out and Buy Something Custom (The Banquette Myth)
The biggest mistake I see people make with a diy breakfast nook is assuming the seating has to be built by a professional carpenter. They price out a custom built-in and immediately abandon the whole project. Here’s the thing: most of the banquettes I’ve seen in real homes started with a simple, sturdy base made from base cabinets or a repurposed bookshelf laid on its side.
In the photo, that white bench running along the window looks polished, but you can achieve that look with plywood and a little trim. Or, you can buy two identical stock kitchen cabinets, screw them together, and top them with a piece of wood cut to size at the hardware store. The [white] cushion hides a multitude of sins, and honestly, nobody will ever know what’s underneath.
Another option if you have a saw and a weekend of patience: build a simple box frame. It’s four pieces of wood, some screws, and a lid that hinges up for storage. The base is where you save the real money, not on the decoration.
The Rule About Table Height (It’s Deceptively Simple)
If you choose a standard dining table, and then you build a banquette to match that height, you have already messed up. The seat height for a built-in bench needs to be lower than a standard chair, usually around 18 inches. You need that lower height so the table can fit over your legs comfortably when you slide in.
This is a huge problem with round table setups. A round table, like the wooden pedestal one in our inspiration photo, has a wider apron that can hit your knees if your seat is too high. Ok so here’s my rule: before you commit to a table height, sit on your cushion and measure the distance from the floor to your knee. Look, a crusty croissant is great, but not when you’re eating it while sitting sideways because you don’t fit under the table.
Same rule applies to the depth. The bench seat shouldn’t be so deep that your back doesn’t touch the wall when you sit down. You might have to add a back cushion, or simply build the base shallower. Think about how a human actually sits, not just how the dimensions look on paper.
Pattern Mixing Can Go Horribly Wrong (Or Beautifully Right)
Let’s talk about the visual balance of the nook in the reference image. You’ve got a blue and white checkered tablecloth, light blue and white striped pillows, and floral patterned cushions mixed in. That should be a hot mess. It isn’t. The reason it works is because the colors are the same, but the scales are different.
Here are some quick ways to mix patterns without making your kitchen look like a clown convention:
– **Keep colors strict.** When you’re mixing stripes and florals, limit everything to two colors. You can use as many patterns as you want if they all hold to the same palette.
– **Let the stripes be the loud one.** Use the checkered tablecloth as the anchor, then let the striped pillows do the talking against the pure white canvas of the bench cushion.
– **Don’t match the floral to the stripe.** You want them to coordinate, not be twins. If your tablecloth is a big repeating pattern, your pillows should be smaller. Make sense?
The worst nook I ever saw had a tablecloth with giant red apples on it, plaid cushions, and a rug with geometric shapes. It was a sensory assault. Just don’t do it. Take a breath and use a solid white base for your built-in, then add your colors on top. That way, when you get sick of it, you just swap out the fabric. No demo required.
Forgetting That You Have to Sit Here Every Day
A breakfast nook that looks pretty in a Pinterest photo but is torturous to sit on is a failure. That built-in bench in the photo might look hard, but the reality is that you’ll be eating there for years. You need to think about the practical mess. You need a waterproof cushion or a removable cover that you can throw in the washing machine. I can’t stress this enough.
I made a set of floor cushions once that were absolutely gorgeous. They were made of this light linen fabric that looked divine in the sunlight. Then my kid dropped a glass of orange juice the size of Lake Michigan all over them. Never again. This mistake taught me to run all my fabric choices through the “stain test” before I even bring them into the kitchen.
Also, if you have a radiator under that window, you need to make sure the bench doesn’t block the heat. And if you have a vent in the floor, you can’t put a solid bench right over it. Your legs will freeze in the winter while your upper body sweats. It’s a weird, claustrophobic feeling, like sitting in a thermal wind tunnel. Keep the air flow clear.
Style Ideas for the Table Centerpiece (Without Clutter)
In the photo, the table is set with white coffee cups, a plate of croissants, and a bowl of fresh red strawberries. It looks effortless, which means it was heavily planned. People make the mistake of trying to decorate the table with too much stuff. A giant vase of flowers looks amazing for about a day, and then it just becomes an obstacle you have to move out of the way while you eat.
You don’t need a big centerpiece to make the space feel fresh. Fruit is honestly the easiest decor. It’s alive, it smells good, and you can eat it when you’re hungry. In that same vein, a small tray with your coffee creamer and sugar can serve as a styled anchor.
The trick is to keep the surface functional. If you have a tiny kitchen, that table needs to be usable. It’s the spot for homework, bills, and hot cocoa. You don’t want to have to clear three different decorative displays just to spread out your laptop.
The Mistake of Ignoring the Window Treatment
The sun comes up, and it is ruthless. That large multi-pane window in the photo looks fantastic, but without the cream-colored roller shade, the whole nook would be unusable by 8:00 AM. You absolutely need a way to control the light, but you don’t want it to eat up your entire budget.
Instead of expensive custom curtains, which are always too long or too short anyway, go for a simple roller shade or a classic Roman shade. It sits tight to the window frame, which is important when you have cushions right underneath it. You don’t want fabric puddling on the bench. That’s a dust bunny trap. And it looks messy, like you forgot to finish putting the room together.
When you hang the shade, hang it high to let in as much light as possible when it’s open. But honestly, the fabric choice matters more. Get something with a blackout liner or at least a light-filtering material. That way, you can sit there on a Saturday morning and read without feeling like you’re being interrogated by the sun.
Making the Corner Feel Finished
The photo above shows a bright kitchen with a corner nook. It works because the bench runs all the way along the window, turning an unused spot into a destination. Don’t make the mistake of leaving soft, blank space between your bench and the table. Put a couple of those striped pillows there. It instantly makes the nook feel loved.
Also, think about the view. If your window looks out at a brick wall, that’s fine, but you might want to put a little shelf on the wall above the nook to add some visual interest at eye level. Just a small shelf with a trailing plant. That will soften the hard lines. It’s the small details that kill the “builder-grade” vibe and make it feel like a cozy breakfast nook.
Don’t overdo the decor. One good painting, one small plant, a couple of pillows. That is all you need. The moment you start adding gallery walls and multiple shelves is the moment you realize your nook looks like a gift shop.
Budget Is a Feature, Not a Bug
Here’s the final thought. People think a round table takes up too much space in a small kitchen, but a pedestal table actually fits better than a square one. You only need to squeeze into the seat on one side, and the pedestal leg means you can slide the table further into the corner than you could with a four-legged model. So a round table is always the right choice for a small kitchen nook.
And about the budget? I spent about $250 on my entire banquette setup. I used metal legs screwed into a wooden top for the table base, and I built the frame with scrap wood from a construction site. The fabric was on clearance during a summer sale. When you avoid the custom-furniture trap, you have money left over to buy the good coffee and the fresh pastries. That’s what you’re actually saving for, right?
I hope this helps you look at that empty corner in your kitchen with fresh eyes. Don’t be scared to try it, just measure twice and keep your color palette strict. You got this.
#budgetbreakfastnook #breakfastnookideas #cozybreakfastnook #kitchennook #diybreakfastnook
Leave a Comment