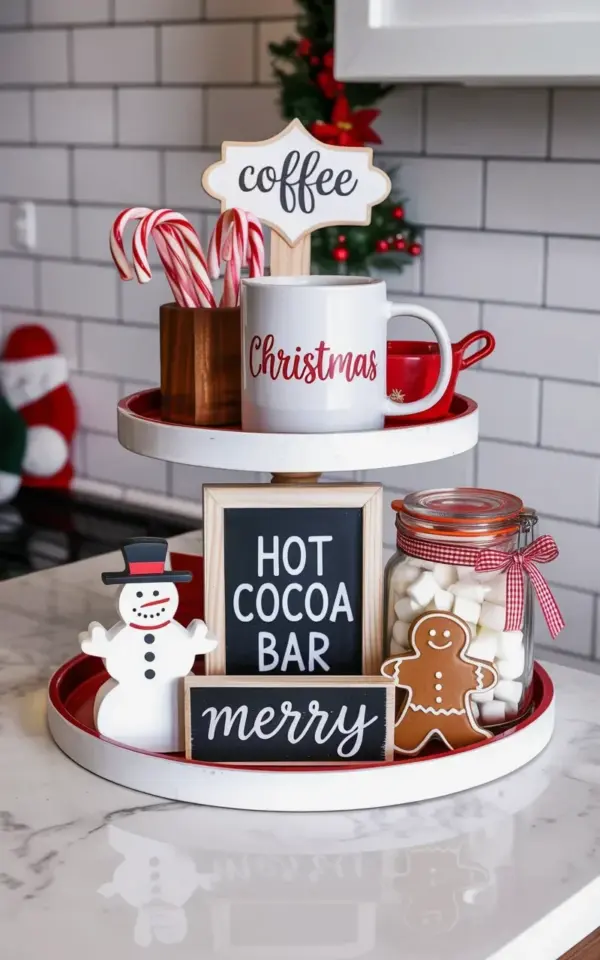
There’s a particular kind of peace that comes from a marble countertop in December. You know the one, where the cocoa mugs are actually put away and the marshmallows live inside a jar instead of scattered across the sink. That’s what this Christmas hot cocoa bar before and after is really about. The after is a two-tiered tray sitting on white subway tile, and it’s a masterclass in holiday decor restraint.
Honestly, the before was probably a cluttered corner with three half-empty bags of chocolate and a stray peppermint stick. But the after? It’s proof that a small tray can hold an entire seasonal mood without taking over your kitchen. Here are six hot cocoa bar ideas I pulled straight from this photo, each one a little different.
A Christmas Hot Cocoa Bar with Candy Cane Flair
The red and white candy canes do all the heavy lifting in this setup. They’re tucked into a wooden holder on the top tier, which keeps them from rolling around and makes them look like a deliberate decoration instead of an afterthought. Candy canes are basically nature’s proof that holiday styling doesn’t have to cost money.
Then there’s the white ceramic mug with the word “CHRISTMAS” printed in red. It’s simple, but it anchors the whole tray. You can replicate this with any mug that has a festive word on it, or just use a plain one and tie a candy cane to the handle. I have a mug that says “MERRY” and the letters are starting to wear off, but honestly I love it more that way.
Tiered Tray Styling with a Chalkboard Sign
The black chalkboard sign with white text reading “HOT COCOA BAR” is the unsung hero. It turns a random collection of objects into a station. Without that sign, you’re just looking at a mug and some candy canes. With it, you’re looking at an intention.
You can write the words with a chalk marker instead of actual chalk if you’re worried about dust. Same look, zero mess. And the contrast between the dark sign and the white marble countertop is exactly what your eye wants to rest on.
If you don’t have a chalkboard sign, try one of these instead:
- An old picture frame flipped backward with a word written on the glass
- A small mirror with a dry erase marker
- A plain wood scrap with a painted greeting
Marshmallow Jars and Checkered Ribbon: Easy Hot Cocoa Bar Ideas
The glass jar with the red and white checkered ribbon is the kind of thing that would normally hold pasta or pickles. But give it a ribbon and suddenly it’s festive. Marshmallows are the cheapest thing in the whole setup, and they photograph better than most expensive ornaments.
That ribbon trick works on almost any container. Wrap it around a mason jar, a milk bottle, or even a plain cereal container. Just make sure the jar has a lip on the neck so the ribbon stays put. I once used a smooth-sided jar and spent ten minutes chasing the ribbon across the counter. Not worth the fight.
You can also swap the marshmallows for mini peppermint bark, chocolate chips, or those little gingerbread men. The jar is the star, the filling is just a bonus.
Adding a Snowman Figurine to Your Holiday Tiered Tray
The decorative snowman on the bottom tier is there to make you smile. It’s not trying to be elegant. It’s not competing with the mug or the sign. It’s just a cheerful little guy with a scarf, and that’s enough.
One figurine is plenty. You don’t need a whole village. Place it on the bottom tier so it anchors the composition without distracting from the top tier. My grandma had a ceramic snowman that lived on the kitchen windowsill all year round, and I never understood it until now. Sometimes a single cute object just makes a space better.
The Wooden ‘Merry’ Sign: A Simple Holiday Decor Touch
The small wooden sign with cursive “merry” is easy to overlook, but it fills the negative space that would otherwise make the tray look bare. Cursive lettering feels softer than block print, which works well against the hard edges of the marble and the ceramic mug.
If you can’t find a “merry” sign, use a “joy” sign or even a single letter like “M” or “J”. Group it with the snowman on the bottom tier, and suddenly the whole tray tells a story, merry, cocoa, snowman, done. That’s the kind of holiday decor that doesn’t require a lot of thinking.
From Cluttered Countertop to Tiered Tray Before and After
Here’s the thing about a before and after like this. A tiered tray forces you to edit. You can’t pile everything on. You have to pick your best items and let them breathe.
Start with a tray, either marble, wood, or metal. Choose a theme, classic red and white, farmhouse, kid-friendly, whatever works for you. Then limit yourself to one mug, one filled jar, one sign, one small figure, and maybe a couple of candy canes. That’s it.
If your countertop currently looks like a hot cocoa explosion, don’t panic. Grab a tray and edit down to your favorites. Pin this post for later, then go make yourself a mug and enjoy the thing you just styled. You deserve it.
Leave a Comment