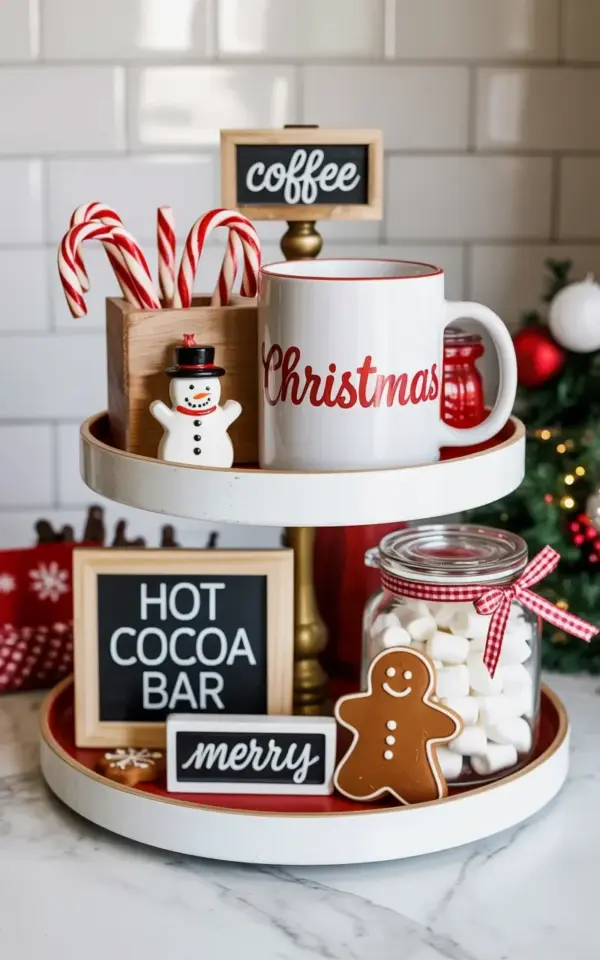
I set up this Christmas hot cocoa bar tiered tray on my marble counter and honestly, I could not stop staring at it. The white subway tile behind it, the red CHRISTMAS mug on top, the candy canes in their little wooden holder, the whole thing just clicked. And here’s the thing: you do not need a perfect kitchen or a thousand dollars worth of accessories to copy this look. You just need a tiered tray, a few basic holiday items, and maybe ten minutes of your time. Not gonna lie, I am a little obsessed with how the marble counter reflects the light off the marshmallow jar. Anyway, let me walk you through exactly how to build this yourself, from the top tier down to that cute snowman on the bottom.
How to Style a Tiered Tray for Christmas Without Overthinking It
Ok so a tiered tray is basically a fancy serving stand with two or more levels. People use them for everything from cupcakes to jewelry, but for holiday counter decor they are pure gold. The trick is to treat each tier like a tiny stage. Put your tallest item on the top tier, because that draws the eye up first. In my tray, the white mug with the big red CHRISTMAS text sits right up top. I placed a wooden holder with two candy canes next to it, just leaning slightly, not perfectly aligned. Why? Because real life is not a catalog photo, and a little imperfection looks friendlier.
On the bottom tier I kept things grounded with a chalkboard sign that says HOT COCOA BAR. That sign is the anchor. Then I added a small wooden merry sign, a glass jar of marshmallows with a red and white checkered ribbon, and a little snowman figurine. It sounds like a lot, but the tray holds everything without looking crowded. Honestly, the biggest mistake beginners make is trying to fill every inch. Leave some breathing room. Your eye needs a place to rest.
- Top tier: focal point item (mug or teapot) plus one small accent (candy canes)
- Bottom tier: a sign for context, then a jar with something edible, then a decorative figurine
- Leave at least one empty space between items, about the width of your thumb
Choosing a Marble Counter and Subway Tile Backdrop for Your Display
You might be thinking, “But I don’t have marble counters or subway tile, my kitchen is laminate and painted drywall.” Listen, I have that counter in this photo because it is my kitchen, but you can fake it or just use what you have. The reason marble and white subway tile work so well is they give a neutral, bright background that makes red and white holiday decorations pop. If your counter is butcher block or dark granite, consider placing a white marble cutting board or a large white tray underneath the tiered tray. That creates a similar look without remodeling anything.
Subway tile is everywhere, but if your wall is plain drywall, do not worry. You can hang a small sheet of white beadboard or even use a temporary peel-and-stick subway tile backsplash. I have a friend who just propped a white foam core board behind her tray for photos. It looked great for two weeks and cost seven dollars. The point is: the background should be clean and fairly plain so the Christmas stuff stands out. Busy wallpaper or dark cabinets will fight with your tray.
The Best Christmas Candy Canes for Your Hot Cocoa Bar (And a Storage Tip)
Let me be real about candy canes. You do not need the fancy gourmet ones with sprinkles or chocolate coating. Classic red and white striped candy canes work best because they read as immediately Christmas. I bought a bag of the standard ones for like three bucks. I put two of them in a small wooden holder that I actually found at a thrift store for fifty cents. (Weird little aside: I spent way too long deciding if the holder should be horizontal or vertical. I chose vertical so the candy canes lean out like little antennae.)
Here is a practical tip: candy canes will go stale if you leave them out for weeks. If you are setting this up in early December, wrap the candy canes in a little cellophane bag before putting them in the holder. That way they stay crisp and you can still see the red stripes. Or just plan to eat them and replace them halfway through the month. That is what I do. Nobody judges a person who eats the decor.
Adding a Chalkboard Sign and Merry Sign: Easy and Rewordable
The black chalkboard sign on my bottom tier says HOT COCOA BAR in white chalk lettering. I did not write that myself, because my handwriting looks like a spider fell in ink. I bought a pack of pre-printed chalkboard signs from a craft store, six for eight bucks. The merry sign is a small wooden block with cursive text, just sitting there casually. You can make one with a scrap of wood and a paint pen, but I bought mine at a dollar bin. Both signs are lightweight and easy to reposition.
Why two signs? The chalkboard sign tells guests what the tray is for, and the merry sign adds a bit of seasonal warmth without being bossy. They stack visually, one larger and one smaller. Do not use three signs, that gets cluttered. Two is the sweet spot. If you cannot find a merry sign, use a small frame that says joy or noel. The word does not matter much, it is the feeling that counts.
DIY Marshmallow Jar with Ribbon: Simple and Surprisingly Useful
That glass jar with the red and white checkered ribbon holds mini marshmallows, obviously. But here is the thing: I almost never use that jar for actual hot cocoa because the marshmallows inside are usually stale by the time I get around to making a cup. I fill it with fresh marshmallows right before a party, then after the holidays dump the rest into a Ziploc bag and use them for s’mores. Not glamorous, but honest.
To make the jar look like something from a magazine, just tie a ribbon around the neck. I used a wired ribbon from a craft store, maybe two feet long, tied in a simple bow. The checkered pattern matches the red in the mug and the candy canes, which is why the whole tray feels coordinated. If you do not have that exact ribbon, use red baker’s twine or a strip of red felt. The goal is a pop of color at the top of the jar, nothing more.
Where to Place Your Holiday Counter Decor for Maximum Impact
I set this tray on my kitchen island, right next to the coffee maker. That spot gets natural light in the morning, and anyone walking into the kitchen sees it immediately. But not everyone has an island. You can put a tiered tray on a kitchen peninsula, a breakfast bar, or even a sideboard in your dining room. The key is not to block things you use every day, like the toaster or the sink. Trust me, you will hate your cute decor if you have to move it three times a day to wash dishes.
If you have a small counter, place the tray near the back edge so it does not take up prep space. And do not put it right under a cabinet or shelf, because the top tier will hit the underside and look squished. Give it room to breathe. Honestly, I moved my tray three times before I settled on the spot in this photo. The first try was next to the microwave, and it looked like an afterthought. The second try was on a corner, and it got knocked over by my own elbow. Third try was perfect. Do not be afraid to experiment.
One more thing: if you have pets, keep candy canes and marshmallows out of reach. My cat is not interested, but my friend’s dog ate an entire bag of marshmallows last Christmas. The dog was fine, the marshmallow jar was not.
To wrap this up, putting together a Christmas hot cocoa bar tiered tray on a marble counter with subway tile is one of those projects that looks complicated but takes almost no skill. You just need a mug, some candy canes, a couple signs, a marshmallow jar, and a snowman or similar figurine. Arrange them with a little space between, and you are done. If you try this, tag me or send a photo, I love seeing how other people make it their own. Happy holidays, and may your cocoa stay warm and your candy canes stay crunchy.
#christmashotcocoa #tieredtraydecor #holidaycounterdecor #christmascandycanes #marblecounter
Leave a Comment