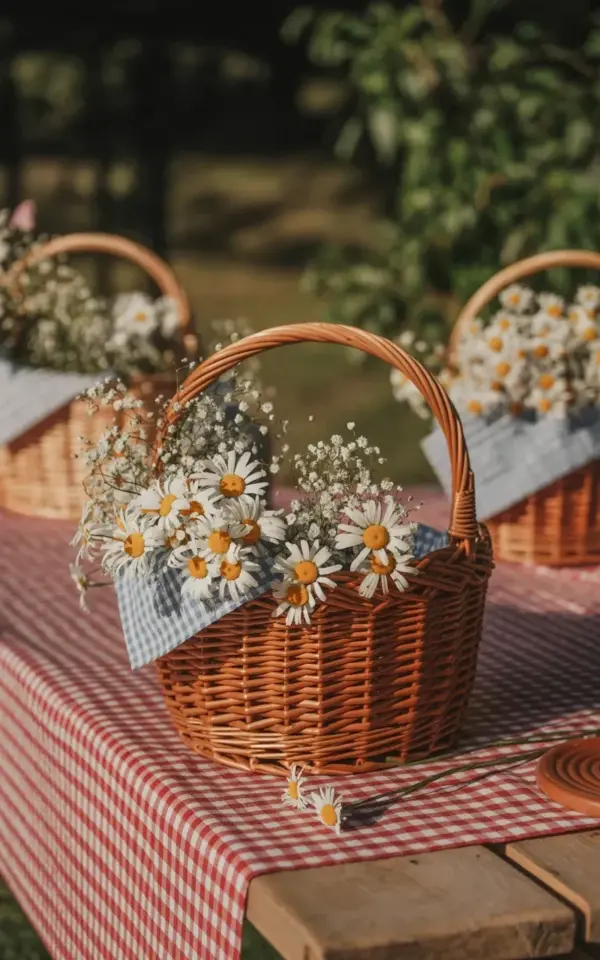
The biggest mistake almost everyone makes with a daisy centerpiece is trying too hard. You find a gorgeous bunch of fresh white daisies, and then you ruin them by obsessing over symmetry, angle, and placement until they look like something from a plastic factory. The magic dies the second you force it. In the photo that started this whole post, the flowers are just tucked into a wicker basket, leaning a little left, doing absolutely nothing special, and yet they look perfect. That is the entire secret.
Look, I get it. When you are setting up a rustic picnic or a spring table, you want it to look intentional. But there is a huge difference between intentional and stiff. The best wildflower arrangements feel like they just happened, like the wind blew them into a basket and you decided to go with it. Let me show you how to actually pull that off without stressing yourself out or wrecking the flowers.
Why Over-Styling Ruins a Natural Daisy Centerpiece
Over-styling happens because we stop trusting the flower. We start fiddling. We pull a stem up a quarter inch, then push it back down, then rotate the basket, then step back and squint. Before you know it, every daisy is standing at attention like a tiny green soldier, and the whole thing looks dead behind the eyes.
The white daisy does not need your help. It is one of the most naturally confident flowers on the planet. Honestly, it looks better with a few crossed stems and a bit of wild chaos than it ever does in a perfect dome. The loose style reads as fresh, effortless, and genuinely rustic. The overworked style reads as a craft project.
Also, over-handling physically damages the stems. Every time you touch the cut end, you introduce bacteria and bruise the tissue. So the less you mess with them, the longer they last. It is a practical reason to step away from the basket.
Gathering the Right Supplies for a Rustic Picnic Flower Arrangement
You do not need a florist kit or a foam block. For a rustic picnic flower setup, keeping it simple is the point. Here is what you actually need:
– One sturdy wicker basket with a handle (the curved handle matters, it frames the flowers nicely)
– A piece of blue and white gingham fabric, big enough to drape over the inside edges
– A small jar, cup, or water bottle that fits inside the basket
– One bunch of white daisies (two if you want it fuller)
– A small handful of baby’s breath, the delicate white kind
– Sharp scissors or pruning shears
That is it. No floral tape, no wire, no grid. You are not building a structure here. You are just putting flowers in a basket. Notice how the blue gingham liner in the photo contrasts with the red and white tablecloth? That small clash is what makes the whole scene feel real and layered. Matchy-matchy is the enemy of rustic charm.
Prepping the Basket and the Liner Like a Real Person
Ok so first, cut a piece of gingham fabric a little larger than the basket opening. You want it to flop over the edges naturally, not tuck in perfectly. The fold marks and creases are good. They add texture. Nobody wants a crisp, ironed liner in a picnic basket. That would be insane.
Fill your jar or cup with room-temperature water and place it inside the basket. If you are worried about it showing, nestle it a little deeper and let the fabric crumple around it. The goal is to hide the mechanics without carefully hiding them. You want someone to look at the basket and see a liner, not a container.
Trim the stems of your daisies at an angle. Cut them at different lengths. This is not a precision task. Do not measure. Snip one short, one medium, one longer, and just alternate. If you cut them all the same length, you will get that flat, boring top edge that screams “florist school.”
Build the Daisy Centerpiece in a Loose Grid, Not a Dome
Here is the actual technique that makes a natural rustic arrangement work. You are going to build a grid, not a dome. Start with a few daisies crossing each other in the center, like an X. Then add stems around the edges, letting them angle outward slightly. Let a couple of them droop a little over the rim of the basket. That movement is what catches the eye.
Crisscross the stems low in the container. This creates a web so the flowers hold themselves up. You do not need any foam. The stems will support each other if you keep them crossing. It is a lazy person’s hack, but it works. Just keep the center dense and let the edges get a little sparser.
And here is the thing. If a daisy falls over every time you set it down, that is fine. Leave it. Some of the best arrangements have a single flower completely reclined. It looks like it is relaxing. That is the vibe you are going for.
Trimming and Tucking Baby’s Breath Without Going Overboard
Baby’s breath is a supporting actor. It should never steal the scene. Break off small sprigs, maybe two to three inches long, and tuck them between the daisies. Do not make little clouds of them. A few wisps here and there is plenty.
The baby’s breath in the photo is so subtle that you almost miss it. That is exactly right. It is there to add a bit of texture and softness, not to announce itself. Sprinkle a few sprigs low near the basket rim and a couple higher up in the middle. Step back. If you can tell exactly where you put them, you used too many.
Also, do not be afraid to leave a few stems sticking out at odd angles. The natural look is forgiving. Actually, it is more than forgiving. It actively rewards a little mess.
The “Put It Down and Walk Away” Rule for Wildflower Arrangements
Here is the most important step in the entire process. Once you have the daisies and baby’s breath in place, put the basket down and walk away. Leave the room. Go pour a coffee. Check your phone. Give it five full minutes.
When you come back, do not touch it. Look at it. That is the arrangement. It is not a draft. It is done. The urge to “fix” one more stem is the exact impulse that ruins natural loose floral arrangements. Fight it.
I know it is hard. There was a time I spent forty minutes on a centerpiece that should have taken eight, and by the end, it looked worse than when I started. The flowers were exhausted, the stems were bent, and I had actually stripped some of the petals off by fiddling. Learning to stop is the skill. That is the actual craft.
Styling the Full Rustic Picnic Scene Around the Flowers
A daisy centerpiece is only one part of the table. To make the whole scene work, let the rest of the table be simple. The red and white checkered tablecloth does a lot of heavy lifting. The blue gingham liner adds that pop of contrast. You do not need much else.
Add a few plates, some simple glassware, and maybe a baguette or a jar of jam. Keep the colors in the same family. Do not add orange napkins or neon cups. Let the white daisies be the brightest thing. Let them be the star.
If you are setting this up for a spring table, put the basket on a wooden board or a stack of old books to give it height. If it is for a picnic on the ground, just set it in the center. The setting tells you what to do. The flowers just sit there looking good.
A Final Word on Keeping It Real
Daisies are not roses. They are not meant to be perfect. They are meant to look like they grew that way, like someone walked through a field and brought the best bits home. Stop worrying about what a “professional” arrangement should look like. Nobody at the picnic is going to inspect your angles. They are going to see white petals, yellow centers, and a basket that looks genuinely lovely.
Save this idea for your next picnic or brunch. Grab some grocery store daisies and a cheap basket, and give it a shot. The whole thing takes less than fifteen minutes, and the only rule you absolutely cannot break is knowing when to quit. That is the secret to the whole post. Now go make something loose, natural, and perfectly imperfect.
Leave a Comment