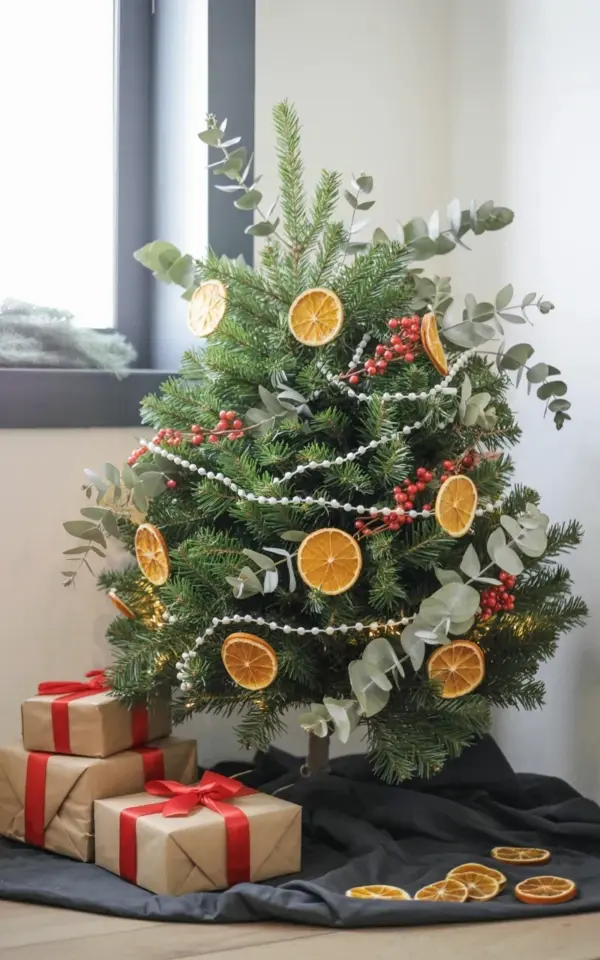
Look, I have a confession about Christmas trees. I spend way too much time scrolling through winter decor photos in July, and the one that made me actually stop and screenshot was this exact setup. A dried orange slice Christmas tree against a white wall, with eucalyptus and red berries and those little pearl strands. It hit that sweet spot between modern and rustic, and I knew I had to figure out how to recreate it without any real skill.
So here’s the thing. You don’t need to be a florist or a craft wizard to pull this off. The tree in that photo looks full and dense, but the decorations are doing all the heavy lifting. Honestly, if you can dry a fruit and wrap a branch, you’re already 90% there.
Why This Dried Orange Slice Christmas Tree Works So Well
The magic is in the contrast. You’ve got that deep natural green of the tree, then these warm amber circles scattered around like little stained glass windows. Against a white wall, everything pops without screaming.
And the best part? Dried oranges are cheap. Like, embarrassingly cheap compared to buying fancy ornaments. A bag of oranges costs less than one of those designer baubles, and you get way more personality from the citrus.
I also love that this style doesn’t demand perfection. Real trees are messy and uneven, and the orange slices just go with that. You’re not trying to create a symmetrical masterpiece here. You’re building a textured, organic-looking tree that feels like it grew that way naturally.
What You’ll Need to Recreate the Modern Rustic Look
Before you start, gather your supplies. I’m assuming you’ve never done any of this, so let me be very specific. Here’s the list I put together after staring at the photo for way too long.
- A live or good-quality artificial Christmas tree with dense branches. The photo shows a full one, so if your tree is sparse, this style won’t work as well.
- Thin floral wire or natural twine for attaching things. You’ll use a lot more than you think.
- Eucalyptus stems, either fresh or fake. I used fresh one year and they lasted about two weeks. Fake ones are fine if you want to reuse them.
- Red berry picks or sprigs. The photo has them tucked in a circular pattern around the oranges.
- White pearl garlands. Not the thick chunky ones, the delicate beaded kind that drape lightly.
- White LED lights. The small warm-white ones, not the big bright bulbs.
- Kraft paper and red ribbon for the gifts at the base.
You might also want a step ladder and a good playlist. This is a take-a-couple-of-evenings kind of project, not a rushed Saturday thing.
Prepping Your Orange Slices: The Beginner-Friendly Method
Ok so first, cut the oranges. Slice them uniformly. Aim for about a quarter inch thick. Not too thin or they’ll burn, not too thick or they’ll take forever to dry.
You have a few options for drying. Oven at 200°F for two to three hours works, but you have to flip them halfway. I tried a dehydrator once and it took longer but smelled amazing. Air drying works too, just takes four to five days and you need dry indoor air. My kitchen isn’t great for that, so honestly, I always use the oven.
Pat the slices dry with paper towels before baking. Some people sprinkle cinnamon or nutmeg on them, which I did last year and now my house smells like a holiday candle for weeks. I regret nothing.
One weird thing I learned the hard way. Blot them again after they come out of the oven. If you skip this, they’ll stay tacky and attract every dust bunny in your living room. Not the look you want.
Arranging the Tree: Eucalyptus, Berries, and Pearls
Start with the eucalyptus. This is your base layer. Tuck the stems deep into the branches so they peek out naturally, not like they’ve been slapped on top. The photo shows eucalyptus scattered throughout, not just at the bottom. Work in sections, from the trunk outward.
Then add your dried orange slices. Here’s my method. Make a small loop of wire through the center of each slice, then hang it from a branch. Use the thicker branches near the trunk for some, but also place them closer to the branch tips for visual balance. In the reference photo, they’re arranged in a circular pattern around the tree, so don’t cluster them all in one spot.
The red berries come next. These are your accent, so use them sparingly. Tuck them near the oranges, almost like they’re growing out of the same branch. A little pop of red goes a long way, and you can always add more later if it feels too green.
Finally, the pearl garland. Drape it loosely, let it hang in gentle loops. Don’t wrap it tight like a spiral of lights. Just let it flow through the branches and catch light from any angle.
Lighting: Making the Citrus Glow Against a White Wall
This is where the whole look comes alive. The white wall in the photo is doing a lot of work, but the LEDs are the thing that makes those orange slices look like they’re backlit.
Use warm white LED lights, not cool white. The cool ones will wash out the orange and make your tree look like an office lobby. I made that mistake once and immediately had to switch them all out.
Weave the lights into the tree before you add any of the other decor. Seriously. If you string the lights after decorating, you’ll knock off a dozen orange slices and then have to rewire everything. I know this from personal frustration.
Once the lights are on, tuck each orange slice so the light can actually shine through the translucent flesh. Not every slice needs to glow, but you want enough that the tree looks dotted with warm little lanterns. Turn off the other room lights to check your progress. That’s the moment you’ll get that satisfied little rush.
The Base: Kraft Paper Gifts and Final Touches for Winter Home Decor
Now for the part everyone loves. Those wrapped gifts at the base. They’re so simple. Just kraft paper, the kind you get in rolls from any craft store, and red ribbon. The photo shows neat red bows, so don’t overcomplicate it.
Use empty boxes so you don’t waste real presents. That way you can keep the display up all season without worrying about someone shaking something. I’ve done this for three years now, and no one has ever realized the boxes are empty.
Position the gifts in front of the tree base, covering the stand or the pot. If you have a plastic tree stand, this is also your chance to hide it. Stack a few boxes at angles, not perfectly straight. A little chaos looks more intentional than you’d think.
Add a final touch of extra eucalyptus or berry sprigs around the base, just a couple of stems leaning against the boxes. It ties the whole bottom together and makes the kraft paper feel like a natural part of the tree, not an afterthought.
Once everything’s in place, step back and look at the whole scene. The white wall behind it, the glowing orange slices, that fresh eucalyptus smell if you used real stems. This is winter home decor at its most welcoming self. You’ll want to sit in front of it with a coffee every single evening. I do.
Done, Now Go Make Your Own Version
Honestly, the hardest part is just starting. You don’t need to match the photo exactly, and honestly yours might look even better with a slight twist. Maybe use lime slices too, or add some cinnamon sticks. The point is to build something that feels like you and fits your space.
I’d love to see what you make with this. Tag me or drop a comment if you try it. I’m always up for swapping tips and talking about dried fruit like it’s the most fascinating thing in the world, because let’s be honest, it kind of is.
Leave a Comment