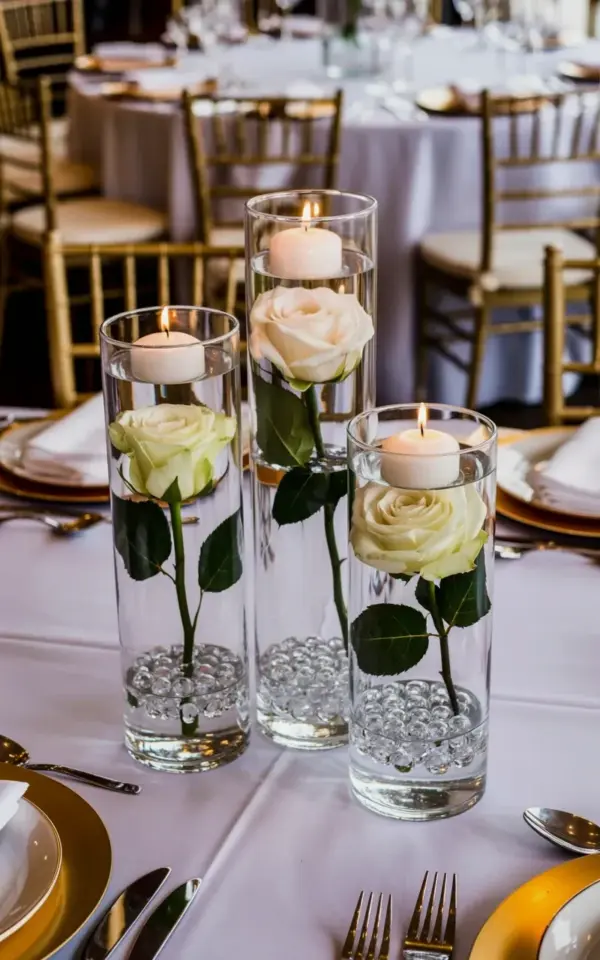
You’re probably here because you saved that photo of three glass vases with roses and floating candles. That weddingcenterpiece idea looks effortless, but the reason it works is a series of small choices that most people get flat-out wrong. I’ve watched brides cry over spilled beads, and I’ve seen a perfectly pretty table turn into a cluttered mess before the toast. So let’s talk about the mistakes, because avoiding them is honestly easier than you think.
Mistake #1: Picking Vases That Fight Each Other
The photo shows three clear glass cylinders in different heights, arranged in a triangle. That unevenness is deliberate. If you grab three identical vases and line them up like soldiers, you get a boring row. If you grab wildly different shapes, you get chaos. The trick is to keep the same thickness and glass clarity, then vary only the height.
Here’s the thing: a tall vase, a medium one, and a short one create depth without shouting. Look for straight-sided cylinders, not curved or fluted ones. Curvy glass distorts the bloom and makes the candle light look weird. Also, make sure the openings are wide enough for your hand. You’ll need to clean them between events, and nobody wants to fish a soggy rose stem out with tweezers. Ask me how I know.
Mistake #2: Turning the Crystal Beads Into a Confetti Cannon
Those clear crystal-like beads at the bottom of each vase are not there to fill the whole thing. They’re there to anchor the rose stem and add a little weight. I once saw a DIY bride pour beads up to the halfway mark. The vase looked like a snow globe, and the beads scratched the glass every time the table got bumped. Terrible idea.
Use about an inch or two of beads, no more. The rose stem should stay hidden, but the beads shouldn’t be the main event. And for the love of everything, buy beads that are all the same size. Mixed sizes look like gravel from a parking lot. Pro tip: add one small floral frog or a heavy marble at the very bottom, then pour beads over it. That keeps the stem from shifting when the candle flickers.
Mistake #3: Forgetting That Roses Have a Timeline
That white rose in the photo is fully bloomed, cream colored, with dark green leaves that look almost leathery. That took time. You cannot buy a tight bud on Tuesday and expect it to look like that on Saturday. Roses need about two to three days to open properly, depending on how tight they were when you got them.
So the real DIY wedding decor trick is to buy the roses early and let them sit in a cool room. Condition them with flower food, trim the stems at an angle, and remove any leaves that would sit below the water line. Rotting leaves create bacteria, and bacteria makes that beautiful white blossom turn brown at the edges. Nobody wants a brown rose on their wedding table. Also, if you’re using a floating candle on top, trim the rose stem short enough that the bloom sits below the water surface but still looks like it’s floating. Too long, and the rose pokes up and knocks the candle off center. Too short, and it sinks like a stone.
Mistake #4: Floating Candles That Sink or Smoke
Ok so here’s the thing about floating candles: not all of them float straight. Some tip over because the wax is uneven, some have a wick that’s too small, and some smoke like a chimney because the wick is too big. For this table flat, you need plain white tea lights that are specifically labeled as floating candles. Regular tea lights have metal cups, and metal cups sink.
Test every single candle before the wedding day. Fill a vase with water, drop the candle in, and watch it for five minutes. If the flame leans or the candle spins, swap it out. I know that sounds obsessive, but I once watched a floating candle drift right over to the rose and singe a petal. Now I buy extra candles and test the whole batch. Use clean, room temperature water, too. Cold water makes the wax contract and can cause cracking.
Mistake #5: Ignoring What’s Around the Centerpiece
The photo isn’t just about the vases. It’s about the gold-rimmed plates, the silver cutlery, the crisp white napkins, and those wooden Chiavari chairs in the background. The centerpiece works because it matches the formality of the table setting. If you put this same arrangement on a rustic farm table with mason jars everywhere, it would look weird.
So before you commit to this wedding table idea, think about your plates and chairs. Gold rims and dark wood call for clear glass and white flowers. Casual dinnerware? You might want to swap the gold accents for something simpler. The beads can also tie into your palette. Use clear beads for a classic look, or a very pale blush if your napkins have a hint of pink. Just don’t go rainbow. That kills the whole formal vibe.
The Right Way to Assemble This Centerpiece in 10 Minutes
You can absolutely do this as a DIY wedding decor project, but you need a system. Start by filling each vase with the beads and a floral frog. Then add water until it’s about two inches from the top. Trim your rose stems, place one rose per vase, and adjust the leaves. Finally, put the floating candles in and check for drips or smoke.
Here’s a quick checklist to keep you sane:
– Use three vases of different heights, but the same style.
– One inch of beads max, all the same size.
– Buy open roses two days before, not one.
– Test floating candles in water before the event.
– Match the formality of your plates and chairs.
– Keep a backup vase and spare roses in the kitchen.
The whole thing looks best when the vases are spaced about eight inches apart in a triangle. That gives guests room to talk across the table without hitting the glass. And trust me, a happy guest is one who doesn’t have to lean sideways to see their date.
So yes, this wedding centerpiece idea is very easy to recreate. Just avoid the bead avalanche, the sinking candle, and the over-bloomed rose. Do that, and your tables will look exactly like the pin. I’d love to hear how it goes for you. Drop a photo in the comments or tag me when you post it, I’m genuinely curious which mistakes you almost made. Happy planning, and save this one for later!
Leave a Comment